
 English
 Spanish
Beginner’s Guide to Automatic Irrigation: How to Install It Without Complications
Beginner’s Guide to Automatic Irrigation: How to Install It Without Complications
Installing an automatic irrigation system does not only make life much easier.
It is also the perfect solution when you cannot water the garden yourself — because you spend a lot of time away from home, have little free time or are going on holiday — and you want to keep your plants healthy.
The problem is that you may not be entirely sure how to install it… and you certainly do not want to end up with areas that receive too little water or leaks somewhere in the system.
For complete peace of mind, the best option is to have it installed by a professional.
However, if you would like to do it yourself, in this article we explain everything you need to take into account.
Let’s get started.
What Components Does an Automatic Irrigation System Have?
Let’s take it step by step.
Automatic irrigation is a system that turns the water supply on and off at programmed times and distributes water throughout the garden.
This ensures that your plants always receive the water they need, even when you are not at home.
An automatic irrigation system can include several different components, but these are the essentials:
Irrigation controller: this is the part that controls the entire system. It connects to the water supply and allows you to programme when the water turns on and off.
Distribution pipes or hoses: these carry the water from the main supply to the different areas of the garden.
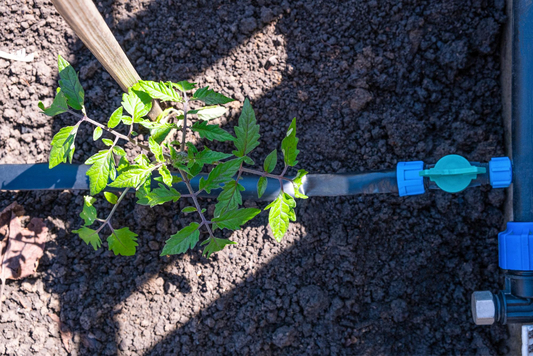
Drippers, spray heads or micro-sprinklers: these are the points where the water is released. Depending on the system you choose, water can drip slowly next to each plant or be distributed as a fine spray.
Connectors and fittings: these are used to divide pipes, create branches or adapt the irrigation system to the shape and layout of the garden.
Depending on the components used, there are several different types of automatic irrigation systems.
Let’s take a closer look.
Which Type of Automatic Irrigation Should You Choose for Your Garden?
Every garden has different requirements.
The size of the garden, the types of plants and the layout of the different areas all play an important role when choosing an irrigation system.
That is why the first step is to think about which areas need watering and what type of vegetation you have in each one.
A garden with ornamental flower beds, lawn areas and a few pots will require different irrigation solutions in each zone.
1. Drip Irrigation
Drip irrigation is one of the most commonly used systems in domestic gardens.
Water is released slowly through small drippers positioned next to each plant, allowing it to reach the root area directly.
This system works particularly well for pots, planters, flower beds, hedges and small vegetable gardens.
It also makes very efficient use of water because it is delivered exactly where the plant needs it.
2. Spray Heads or Sprinklers for Lawn Areas
For larger lawn areas, spray heads or sprinklers are generally the most suitable option.
These devices distribute water over a specific area in the form of rainfall.
This allows larger surfaces to be watered evenly.
Lawns need more uniform watering than many other plants, which is why this type of irrigation is usually the best option for these areas.
3. Micro-Sprinklers for Areas with Lots of Plants
Micro-sprinklers are an intermediate solution between drip irrigation and conventional sprinklers.
Instead of watering a single point, they distribute water over a small surrounding area.
They are useful in areas where many plants grow close together, such as dense shrub beds or groups of ornamental plants.
How to Install an Automatic Irrigation System Step by Step
Once you have chosen the irrigation system that best suits your garden, it is time to install it.
With some basic planning and a little patience, a simple system can be installed without too many complications.
1. Plan the Irrigation Layout
Before laying any pipes, think carefully about which areas need more water and how you can distribute the irrigation points.
Good planning allows you to position drippers or spray heads correctly and distribute the water more efficiently.
2. Install the Main Pipe
The next step is to install the main pipe that will carry water around the garden.
This pipe is usually placed around the edges of flower beds or alongside garden paths so that it remains as discreet as possible.
Branches can then be created from this main line to carry water to each individual area.
3. Install Drippers or Spray Heads in Each Area
Once the pipes are in place, you can install the irrigation outlets.
In drip systems, drippers are positioned close to each plant, while lawns generally use spray heads or sprinklers.
Pay particular attention to the distance between irrigation points so that water reaches the entire area properly.
4. Connect the Controller and Adjust the System
The final step is to connect the irrigation controller to the water supply and programme the watering schedule.
Once the system is activated, carry out an initial test to make sure that water is reaching all areas correctly.
If a plant receives too much water or an area remains dry, you can adjust the position of the drippers or add another irrigation point where necessary.
Are You Planning to Install an Automatic Irrigation System in Your Garden?
An automatic irrigation system offers many advantages.
However, it is important to install it correctly to avoid areas receiving too much or too little water, or even leaks.
That is why, if you are planning to install this type of system and have any doubts, our advice is to leave it in the hands of a professional.
At Viveros González, we have many years of experience designing gardens and irrigation systems adapted to each individual space.
We know how to distribute irrigation efficiently so that every plant receives the water it needs while making the most of every drop.
If you would like us to help you, get in touch and tell us what you have in mind.
We will be delighted to help you keep your plants healthy and happy.